

Hello 365 Officers,
Today we will see how to set-up the AvePoint Online Backup Solution for Office 365. It is a very straightforward solution that could save a bunch of time and money in case of recovery scenarios.
Prerequisites
- We will assume that you have in your hand an Office 365 Tenant ready with an administrative account (Global admin rights at least for the set-up).
- As it is a SaaS cloud App browser based, you should have a compatible browser:
Browser
Version
Internet Explorer
IE 11
Google Chrome
The latest version
Mozilla Firefox
The latest version
Microsoft Edge
The latest version
Safari
The latest version
- A payed licence is not necessary, you could set-up all your configuration using a trial licence for 30 days (all online services are available for trial). You will have a limitations of 5 objects per technology / product.
By the way, the process to set up a production platform is the same. Subscribe for a trial and then assign licences to your customer from Partner portal.
Set-up
- Navigate to the site https://partner.avepointonlineservices.com/ and create your account (if you don’t have one).

You should land on this page (With existing services or not). - Click on “Invite New Customer”, and select “Office 365 Global Admin”

A Global admin account is necessary for registration with at least Exchange and SharePoint online licences assigned.
But it is not recommend that the Global Administrator be assigned to a personalactive user account once you are using AvePoint Online Services. So you shoulduse a separate service account to handle all administration. - This question will be asked to you: “Do you need to sign out of a currently signed-in Office 365 account so you can log into the customer’s tenant?”
Pretty clear question, click no if you are already signed-in. - Check bellow the permissions required by the app before validating the next step.

Then wait a bit will the access is being granted.
An app profile will be automatically created with “All permissions” settings. Profile are used to manage AvePoint Online Services items like creation of users (accounts) in the portal or register new dynamic objects. It is possible to manage profile with more granularity by reducing the profile scope with specific permissions for example “SharePoint Online” or “Exchange Online” only. In some situation specific app profile are required like a tenant with MFA activated. In this “How to” we will not cover the App profile creation. - On the next step, complete the account Information. An important choice is the datacenter for your data, actually (7/28/2017) the available locations are:
- Austrialia
- Singapore
- Ireland
- Osaka
- USA

It is important to quote that all data centers are Microsoft-owned and “operated” Azure data centers.
- On the next step, click on “Add a Service”:
- Select “Avepoint Cloud Backup” as your Service Type
- For the “License Type”, set “Trial” (or directly “Enterprise” if the licences as already been granted to this customer)
- The number of seats should be associated with the bought licenses.
- Finnaly clik on “Add” button

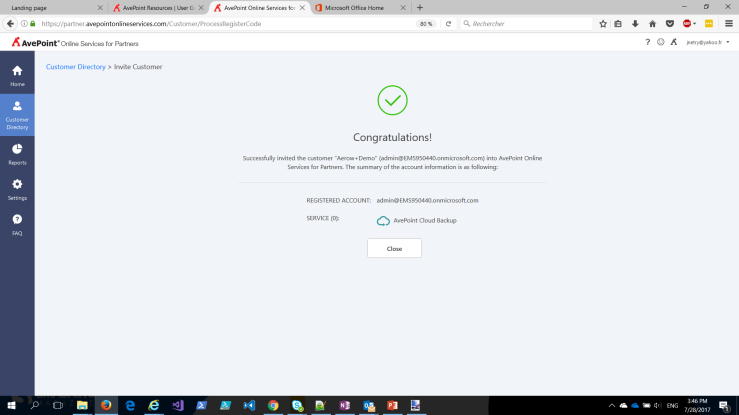
- To complete the process, please click on the “Invite Customer” button, then finally the service will be added to your dashbord.
- Go back, to the “Customer Directory” screen, and select your new service (click on the registered mail adress). You will be asked again to provide a privilged account.
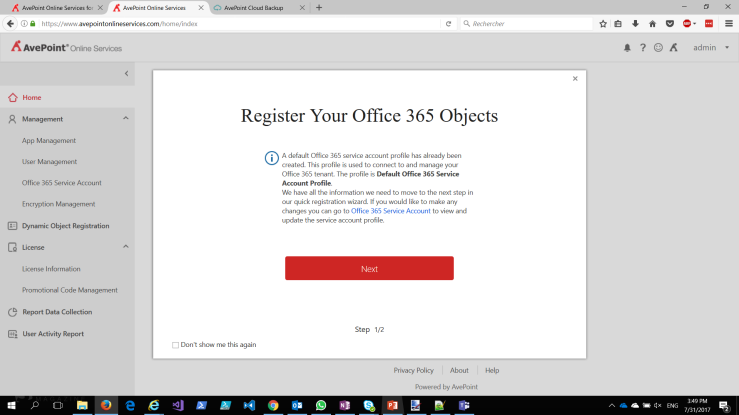
NB: I have already added a default profile, with a specific account. If you would like also to use a different account you can cancel this step, create it and go back to “Home” or Dynamic Object Registration”. - Then it is time to start to define the backup perimeter.

You have to select between 2 modes:- Express mode: This mode is the easy way to go on. It will configure the objects for you backuping everything (This is the recommended mode by AvePoint for less than 300 users). I strongly recommend you to not use it, otherwise your bought storage quotas will be blow up as soon as you will click on “Start”. As you already know, storage is one of the biggest expenditures in the cloud world, and it’s true for Avepoint products too.
- Advanced mode: The way to go. You can manage precisely your backups with automated business rules based on many criterias (This is the recommended mode by Avepoint for more than 300 users).
- Mailbox Backup Set-up
On the “Dynamic Object Registration”, tab Mailbox, you can setup one or multiple containers that will be used to target mailboxes for backup (same method “Content by Search” for other objects). One container can be made up of one or multiple rules that results in one or multiple mailboxes.

An example of critiera to define rules for mailboxes are:
– City
– Company
– Contry or Region
– Department
– Display Name
– Mailbox Type
– Office
– Office 365 Subscription Name
– State or Province
– User ID
– Zip / Postal CodeEach rule use classic operators (equals, contains, match,…) and can also be combined with others using “classic” boolean operators.Then an important setting is the choice of the answer “What if something doesn’t match?”. This is the behavior to set up if any of the rules defined in all containers
not meet the criteria specified. You have to select one of the following depending on your business cases:
– Do not add them to any containers
– Add them to the system default container (Default Mailbox Container)
– Add them to a custom container
Again avoid backuping useless items, so the preferrd option would be the first one. - OneDrive for Business Backup Set-up
Same process here.

- Site Collection Backup Set-up
Same process here.

- Office 365 Backup Set-up
Same process here.

When i’m writing these lines, AvePoint Online Backup is the only one that can backup Office 365 Groups. So if it is your target, you should at least consider this product. - To finish your set-up, just click on finish (if you have forgotten a platform to backu a warning will be shown to you). Finally you should have a confirmation screen like this.

If go back to the “Dynamic Object Registration” menu, you can see your backup profile with the current status (As it is just created, the status is “Not started”).

Be aware that the status shown here is only the rules scanning and not the real backuping process job that is a separate one. - To access your backups, go back to “Home”. Then click on the “AvePoint Cloud Backup Tile”

Then from here, you can monitor your backup process per platform basis, restore objects or observe the activity report.
I hope you enjoy this article, feel free to leave a comment or question.
Here are the “Coming soon” topics:
- Restore Office 365 Objects and monitor your backups integrity
- Managing Backup Profile and Pool Account
- Managing Backup Encryption on Azure
References
- AvePoint Public Site
- AvePoint White Papers
- Avepoint Online Services User Guide (registration needed)
